Transform Your Property: The Ultimate Guide to Building an ADU in California

samantha Johnson • October 28, 2024

Are you thinking about adding an Accessory Dwelling Unit (ADU) to your property in Southern California? With the rise in housing needs and the desire for flexible living spaces, ADUs have become an increasingly popular solution. At Builder's Innovation Group in Murrieta, CA, we’re passionate about helping homeowners transform their properties with thoughtfully designed ADUs. Whether you're looking to generate rental income, accommodate family, or simply increase your property value, this guide covers everything you need to know to make your ADU dream a reality.

Understanding Accessory Dwelling Units (ADUs)


What is an ADU?
An Accessory Dwelling Unit, or ADU, is a secondary housing unit on a residential property. It can be attached to your primary home or stand alone as a separate structure. ADUs offer a variety of uses, from providing extra living space for family members to generating rental income. They are self-contained units with their own entrances, living areas, and amenities, offering privacy and convenience.


Types of ADUs in Southern California
ADUs come in several forms, each with unique advantages:

  • Detached ADUs: Standalone units separate from the main house, offering maximum privacy.
  • Attached ADUs: Connected to the primary residence, allowing easy access between the two living spaces.
  • Junior ADUs (JADUs): Smaller units (less than 500 square feet) created within existing structures like garages or basements.
  • Garage Conversions: Transforming your existing garage into a functional living space.
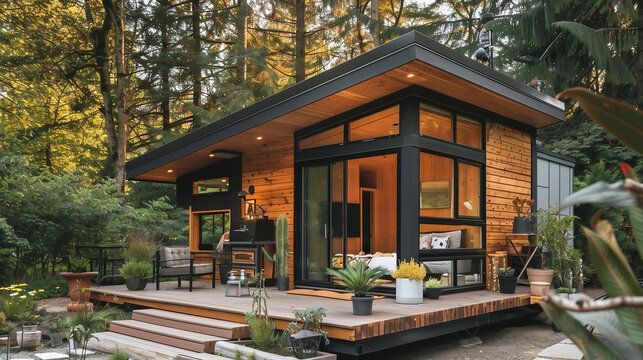
  • Backyard Cottages: Cozy, standalone structures built in your backyard, perfect for a secluded retreat.


Benefits of Building an ADU


Generating Rental Income
One of the most compelling reasons to build an ADU is the potential to earn rental income. ADUs are highly attractive to renters seeking privacy and comfort compared to traditional apartment living, often featuring private entrances and outdoor spaces.


Increasing Property Value
Adding an ADU to your property can significantly boost its market value. In Southern California's competitive real estate market, an ADU can set your property apart, making it a smart financial investment.


Flexible Living Arrangements
ADUs offer versatile living solutions, whether you're looking to accommodate aging parents, provide a space for adult children, or create a guest house. They allow families to stay close while maintaining independence.


Promoting Sustainable Living
ADUs maximize the use of existing land and resources, promoting sustainable living by minimizing the need for new construction. Many homeowners opt for eco-friendly designs and energy-efficient materials, reducing their environmental footprint.


Legalities and Regulations for ADU Construction in Southern California


Zoning Laws and Building Codes
Navigating the legal landscape is a critical step in ADU construction. Southern California has specific zoning laws and building codes that regulate ADUs, including size limitations, height restrictions, and setback requirements. The California Department of Housing and Community Development provides guidelines to ensure your ADU meets all state standards.


Eligibility Criteria for Building an ADU
Almost any residential property in Southern California can accommodate an ADU, but it's essential to check with your local planning department to confirm specific eligibility criteria. Factors like lot size, zoning restrictions, and available space will determine what type of ADU you can build.


Permitting Process and Required Documents
Securing the right permits is vital for a smooth construction process. Typical documents needed include building plans, permit applications, and declarations specific to ADU construction. Working with experienced professionals like Builder's Innovation Group can help streamline this process, ensuring all requirements are met and avoiding costly delays.


Steps to Successfully Construct an ADU in Southern California


Selecting the Right Professionals for Your Project
Choosing the right team is crucial to the success of your ADU project. At Builder's Innovation Group, we specialize in ADU construction, bringing extensive experience and a deep understanding of local regulations. From architects to contractors, we ensure that your project is handled by experts every step of the way.


Site Preparation and Foundation Work
Proper site preparation sets the foundation for your ADU’s success. This phase involves clearing the site, grading the land, and laying the foundation while installing essential utilities like plumbing and electrical connections. A well-prepared site ensures that your ADU is durable, efficient, and ready for construction.


Constructing the ADU: From Framing to Finish
Building your ADU involves framing the structure, installing doors and windows, and completing the interior with drywall, flooring, and fixtures. We focus on high-quality craftsmanship and attention to detail, ensuring your ADU is both functional and beautiful from the inside out.


Ensuring Proper Insulation and Utility Planning
Proper insulation is key to maintaining a comfortable living environment in your ADU. We use high-quality materials to ensure your unit is energy-efficient, helping you save on utility bills. Planning for utilities early in the process ensures that your ADU meets all safety standards and is fully functional from day one.


Cost Considerations for ADU Construction


Breakdown of Construction Costs
Building an ADU involves various costs, including permits, materials, labor, and design fees. At Builder's Innovation Group, we provide transparent cost estimates and work with you to create a budget that meets your needs without compromising quality.


Estimating Total Project Costs
The cost of building an ADU can vary widely depending on size, design complexity, and finishes. In Southern California, you can expect construction costs to range from $300 to $400 per square foot. We recommend budgeting an additional 5-15% for unforeseen expenses to keep your project on track.


Financing Options to Make ADU Construction More Affordable
Financing your ADU project can be manageable with the right options. Home equity loans, lines of credit, and government programs are available to help fund your build. Rental income from your ADU can also help offset construction costs over time.


Common Mistakes to Avoid When Building an ADU


Skipping Proper Permits and Compliance
Avoid the temptation to cut corners by skipping permits or hiring unlicensed contractors. Doing so can lead to legal issues, fines, and potential safety hazards. Always ensure your ADU complies with all local regulations.


Choosing the Wrong Location or Design
Selecting the wrong site or layout can complicate your build and reduce the functionality of your ADU. Work closely with professionals who understand the nuances of ADU design to create a space that meets your specific needs.


Underestimating Time and Financial Commitment
Building an ADU is a significant investment of time and money. Proper planning and realistic expectations are crucial to keeping your project on schedule and within budget.


Tips for Successful ADU Construction


1. Creating a Functional Layout
A well-designed layout maximizes your ADU’s livable space. We focus on creating efficient floor plans that cater to the needs of future occupants, ensuring every square foot is put to good use.


2. Choosing Quality Materials Within Your Budget
Investing in quality materials is key to the longevity and comfort of your ADU. We help you find the right balance between durability and cost, selecting options that provide value without sacrificing quality.


3. Planning for Utility Connections and Efficiency
Early planning for utilities ensures your ADU is ready for use from the moment construction is complete. We incorporate energy-efficient solutions, such as proper insulation and solar options, to enhance the sustainability of your unit.


Selecting the Right ADU Contractor


Importance of Hiring Experienced ADU Specialists
Not all contractors are created equal, especially when it comes to ADU construction. Choosing a contractor with specific ADU experience, like Builder's Innovation Group, ensures that your project benefits from expert knowledge and a proven track record.


Questions to Ask Potential Contractors
Before hiring a contractor, ask about their experience with ADUs, their portfolio of completed projects, and references from previous clients. This will give you confidence in their ability to deliver a high-quality build.


Reviewing Portfolios and Checking References
Take the time to review your contractor’s portfolio and speak with past clients. This due diligence helps ensure that you’re working with a reliable professional committed to building an ADU that meets your vision.


Make Your ADU Dream a Reality with Builder's Innovation Group


Building an ADU is more than just adding space—it’s about enhancing your property, accommodating loved ones, and making a smart financial investment. At Builder's Innovation Group, we’re here to guide you through every step of the process, from planning and permits to construction and finishing touches. Ready to start your ADU journey? Contact
Builder's Innovation Group in Murrieta, CA, today, and let’s bring your vision to life!

By Jordan Box August 18, 2024
A typical bathroom remodel usually takes anywhere from four to six weeks to complete, covering the pre-planning, demolition, construction, and finishing stages. The process involves detailed assessments, meticulous removal of existing elements, skilled construction work, and careful attention to finishing touches. Each stage requires expertise and precision to guarantee the project stays on schedule and meets your vision for the space. If you're interested in learning more about the specific tasks involved in each stage of a bathroom remodel, the following outline outlines the key steps to achieve a successful renovation. Pre-Planning Stage During the pre-planning stage of a bathroom remodel, thorough assessment of the existing space and consideration of desired changes are fundamental steps to guarantee a successful project execution. Before diving into demolition and construction, it is vital to evaluate the current layout, plumbing, electrical systems, and overall functionality of the bathroom. This assessment helps in identifying any potential issues that may arise during the renovation process and allows for proper planning to address them effectively. Additionally, determining the desired changes and goals for the remodel is key to setting a clear direction for the project. Whether the aim is to increase storage space, improve aesthetics, or enhance functionality, having a well-defined vision helps in making informed decisions throughout the renovation process. Considerations should also be made regarding budget constraints, timeline expectations, and any specific requirements or preferences of the homeowner. Demolition and Removal Upon commencing the demolition and removal phase of a bathroom remodel project, meticulous planning and precise execution are essential to guarantee a smooth transition from the pre-planning stage. This phase involves the careful removal of existing fixtures, cabinetry, tiles, and any other elements that are being replaced or upgraded. It is vital to have a detailed plan in place outlining the sequence of removal to minimize disruptions and maintain the safety of the construction team and the property. The demolition process typically starts with shutting off utilities like water and electricity to the bathroom to prevent accidents. Next, the removal of fixtures such as sinks, toilets, and bathtubs is undertaken systematically to avoid damage to surrounding structures. Walls and flooring are then addressed, with special attention given to any potential issues like mold or water damage that may be uncovered during demolition. Proper disposal of debris is also an essential aspect of this phase, ensuring compliance with waste disposal regulations and maintaining a clean and organized work environment for the upcoming construction phase. Construction and Installation The construction and installation phase of a bathroom remodel project demands careful attention to detail and skilled craftsmanship to guarantee the successful transformation of the space. This stage involves the actual rebuilding and installation of new elements in the bathroom, such as plumbing, electrical wiring, flooring, cabinetry, and fixtures. Professional contractors with experience in bathroom renovations are essential during this phase to make sure that everything is installed correctly and up to code. During construction and installation, precise measurements, cutting, and fitting of materials are necessary to achieve a coherent and functional design. Plumbing and electrical work must be done meticulously to prevent future issues. Proper installation of tiles, countertops, and fixtures is important for both the aesthetic appeal and functionality of the bathroom. Timely completion of this phase is vital to keep the project on schedule and within budget. Effective communication between the homeowner and the contractors is crucial to address any unexpected challenges that may arise during this phase. Finishing and Final Touches To achieve a refined and integrated final result, the finishing and final touches phase of a bathroom remodel focuses on careful attention to detail and the installation of decorative elements that enhance the overall design aesthetic. During this critical stage, all elements come together to create a harmonious and visually appealing space. This phase involves installing fixtures such as faucets, lighting fixtures, towel bars, and mirrors. Each item is carefully selected to complement the overall design scheme and guarantee functionality. In addition to fixtures, finishing touches may include grouting tiles, sealing countertops, painting walls, and adding trim work. These steps require precision and expertise to guarantee a flawless outcome. Details such as selecting the right paint color, choosing the perfect hardware finishes, and placing accessories strategically can elevate the design to a whole new level. Paying attention to these final details is vital in transforming a standard bathroom into a luxurious retreat. Ultimately, the finishing and final touches phase is where the vision of the remodel comes to life, showcasing the homeowner's style and creating a space that is both beautiful and functional. Other Kitchen Remodeling ideas: Steps to Successfully Remodel Your Bathroom When Remodeling a Bathroom, What Comes First?
By Jordan Box August 18, 2024
Upgrade your bathroom affordably with these tips: update fixtures, paint walls, and enhance lighting. DIY projects like repainting, changing hardware, and adding decor can transform the space. Consider affordable fixture replacements to boost style and efficiency. Utilize intelligent storage solutions like floating shelves and vanity organizers to maximize space. These strategies from bathroom remodeling contractors offer a cost-effective way to refresh your bathroom. Budget-Friendly Bathroom Design Ideas Integrating budget-friendly design elements can significantly enhance the aesthetic appeal of a bathroom renovation project without breaking the bank. One economical idea is to focus on updating the fixtures in the bathroom. Swapping out old faucets, showerheads, and drawer pulls with modern, stylish alternatives can give the space a fresh look without a hefty price tag. Another tip is to paint the walls a new color or add a trendy wallpaper accent wall. This simple change can transform the entire feel of the bathroom without the need for a complete renovation. Additionally, updating the lighting fixtures can significantly impact the overall design of the bathroom. Installing energy-efficient LED bulbs or stylish sconces can add a touch of elegance and modernity while keeping costs low. Lastly, integrating new accessories such as towels, rugs, and artwork can tie the design together and give the space a coherent and polished look. A bathroom renovation can be affordable and visually appealing by focusing on these budget-friendly design elements. DIY Bathroom Renovation Tips To further improve your bathroom renovation project while reducing costs, consider implementing DIY bathroom renovation tips. These tips can add a personal touch and save money. DIY projects allow for customization and provide a sense of accomplishment. Start by repainting the walls or cabinets to give the bathroom a fresh look. Changing the hardware, such as drawer pulls and faucet handles, can also significantly impact at a low cost. Installing new light fixtures or updating the mirror frame can modernize the space. Consider tackling small tiling projects like a backsplash or accent wall, which can elevate the bathroom's aesthetic appeal. Replacing old caulk and grout can make the area look cleaner and more polished. Moreover, creating your decor pieces, like shelving or artwork, can add personality without breaking the bank. Remember to research techniques and gather the necessary tools before starting any DIY project to ensure a successful and cost-effective bathroom renovation. Affordable Fixture and Fittings Upgrades Consider cost-effective ways to upgrade fixtures and fittings in your bathroom to enhance its overall look and functionality without overspending. When upgrading fixtures on a budget, consider replacing old faucets and showerheads with newer, more efficient models. Fixtures like these not only improve the bathroom's aesthetic appeal but can also help save on water usage in the long run, reducing utility costs. Another affordable upgrade is replacing worn-out cabinet hardware with stylish and modern alternatives. This simple swap can instantly revamp the look of your bathroom vanity or storage cabinets without needing a total replacement. Additionally, updating lighting fixtures can significantly impact the ambiance of the space. Consider energy-efficient LED bulbs or stylish fixtures that complement the bathroom's overall design. Maximizing Storage in a Small Bathroom Efficient use of available space is crucial when maximizing storage in a small bathroom. In a limited area, every inch counts, making clever storage solutions essential. Consider installing floating shelves above the toilet or next to the sink to store toiletries and towels without occupying precious floor space. Using the back of the bathroom door with an over-the-door organizer can provide extra storage for items like hair tools, cleaning supplies, or extra toiletries. Opting for a vanity with built-in storage or adding baskets underneath the sink can help keep the countertop clutter-free. Vertical storage solutions, such as tall cabinets or ladder shelves, can maximize space while drawing the eye upwards, creating the illusion of a larger bathroom. Moreover, incorporating mirrored cabinets adds storage for medicines and cosmetics and reflects light, making the space feel brighter and more open. Other Kitchen Remodeling ideas: How Long Does a Bathroom Remodel Take? Steps to Successfully Remodel Your Bathroom
By Jordan Box August 18, 2024
Revamp your small bathroom with Murrieta's bathroom remodelers by strategically planning the layout. Efficient fixture placement optimizes space. Consider a corner sink or wall-mounted toilet for more room. Install a shower-tub combo for dual functionality. A large mirror above the vanity creates the illusion of a larger space. Maximize storage with floating shelves, organizers, and under-sink drawers—update fixtures with modern designs and consistent finishes. Add a fresh coat of light paint and decorative backsplash. Choose the proper lighting with overhead fixtures, task lighting, and LED bulbs. These tips will help you achieve a functional and stylish small bathroom remodel. Planning Your Layout When planning your layout for remodeling a small bathroom, strategically placing fixtures is critical to maximizing space efficiency and functionality. Begin by evaluating the dimensions of your bathroom and identifying areas where fixtures can be effectively put to create a sense of openness. Consider installing a corner sink or a wall-mounted toilet to save floor space. These options can provide extra room for movement and storage. Besides, incorporating a shower-tub combo can be a space-saving solution, allowing for bathing and showering in a compact area. Another essential aspect to keep in mind is the positioning of your vanity and mirror. Choose a pedestal sink or a floating vanity to free up floor space and make the room feel less cluttered. Placing a large mirror above the vanity can also create the illusion of a larger space. Moreover, installing shelves or niches in the shower area can help eliminate the need for bulky caddies, keeping your toiletries organized and easily accessible. You can transform your small bathroom into a functional and visually appealing oasis by strategically arranging fixtures and accessories. Maximizing Storage Solutions Strategically utilizing vertical space and implementing clever organization solutions can significantly enhance the storage capacity of a small bathroom during the remodeling process. When dealing with limited square footage, every inch matters. Consider installing floating shelves above the toilet or sink to store toiletries and towels. Utilize the back of the bathroom door by adding an over-the-door organizer for items like hair tools, cleaning supplies, or extra toiletries. Maximize storage under the sink by adding pull-out drawers or baskets to keep cleaning products and extra toilet paper neatly tucked away. Invest in an attractive storage ladder to hang towels or place baskets for additional storage without taking up precious floor space. Wall-mounted cabinets or recessed shelves can provide extra storage for medicines, cosmetics, or other small items. To make the most of your storage solutions, declutter regularly and keep only essential items in the bathroom. By combining practicality with style, you can create a functional and organized space in even the smallest bathrooms. Updating Fixtures and Finishes Enhancing a small bathroom's aesthetic appeal and functionality often involves updating fixtures and finishes to create a unified and modern look. Consider replacing outdated faucets, showerheads, and cabinet hardware with sleek, contemporary designs when updating fixtures. Opting for fixtures in a consistent finish, such as brushed nickel or matte black, can tie the space together for a harmonious feel. For finishes, a fresh coat of paint can work wonders in a small bathroom. Light, neutral colors like soft gray or pale blue can make the space feel larger and more inviting. Adding a decorative backsplash or updating the flooring with modern tiles can elevate the overall design aesthetic. Incorporating stylish accessories such as towel racks, mirrors, and shelving units can further enhance the bathroom's functionality while adding a touch of personality. Don't overlook the importance of coherent design elements – selecting fixtures and finishes that complement each other will result in a polished and inviting small bathroom. Choosing the Right Lighting To truly improve the ambiance and functionality of a small bathroom, selecting the right lighting fixtures is critical in creating a well-lit and inviting space. When choosing lighting for a small bathroom, it's crucial to consider both the practicality and aesthetics. For general lighting, overhead fixtures like flush mounts or recessed lighting can provide ample brightness throughout the space. Adding a dimmer switch can offer versatility, allowing you to adjust the light intensity based on your needs and mood. Task lighting is vital for specific areas, such as the vanity or shower. Wall-mounted sconces or vertical fixtures on either side of the mirror can help reduce shadows and provide excellent illumination for grooming tasks. Incorporating accent lighting, such as LED strips under cabinets or around the bathtub, can add a touch of elegance and enhance the overall ambiance of the bathroom. Remember to choose LED bulbs for energy efficiency and longevity. You can transform your small bathroom into a well-lit and stylish retreat by carefully selecting a combination of lighting fixtures. Other Kitchen Remodeling ideas: How To Remodel a Bathroom On a Budget? How Long Does a Bathroom Remodel Take?